Raspberry Pi Humidity and Temperature Sensor and Dashboard

Connecting IoT sensor readings to a real-time dashboard was a pain, so we built EON, an open source JavaScript framework for real-time charts, maps, and dashboards. This opens up a ton of use cases for the embedded world, from Raspberry Pi, to Arduino, to Atmel MCUs, enabling you to collect sensor readings and visualize the data readings on a live-updating UI.
In this post, we’ll use a Raspberry Pi Model B and DHT sensor to collect humidity and temperature data and stream it to a real-time, live-updating line and gauge chart. The entire code repository can be found here.
There are three main components to this tutorial:
- The Raspberry Pi circuit and sensor to collect temperature and humidity.
- PubNub connects the Pi sensor to the web browser interface and sends the data in real time.
- EON charts the data on the real-time UI.
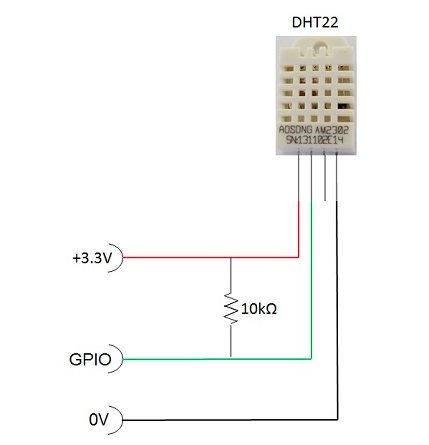
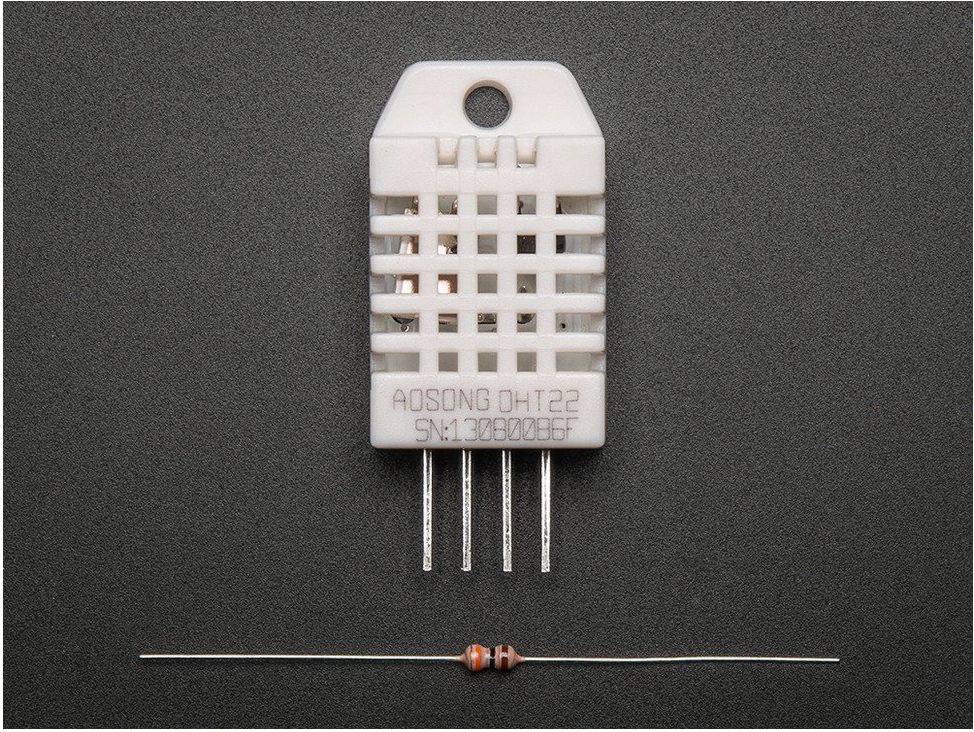
The DHT22 is a basic, low-cost digital temperature and humidity sensor. It uses a capacitive humidity sensor and a thermistor to measure the surrounding air, and spits out a digital signal on the data pin. Connect the first pin on the left to 3.3V power, the second pin to your data input pin and the right most pin to ground.
Part 1: The Hardware Setup
1. The DHT22 Sensor
2. 3 jumper wires
3. Breadboard
4. 4.7kΩ (or 10kΩ) resistor 5.Raspberry Pi 2 loaded with the Raspbian OS.
Set up the circuit according to the following figure:

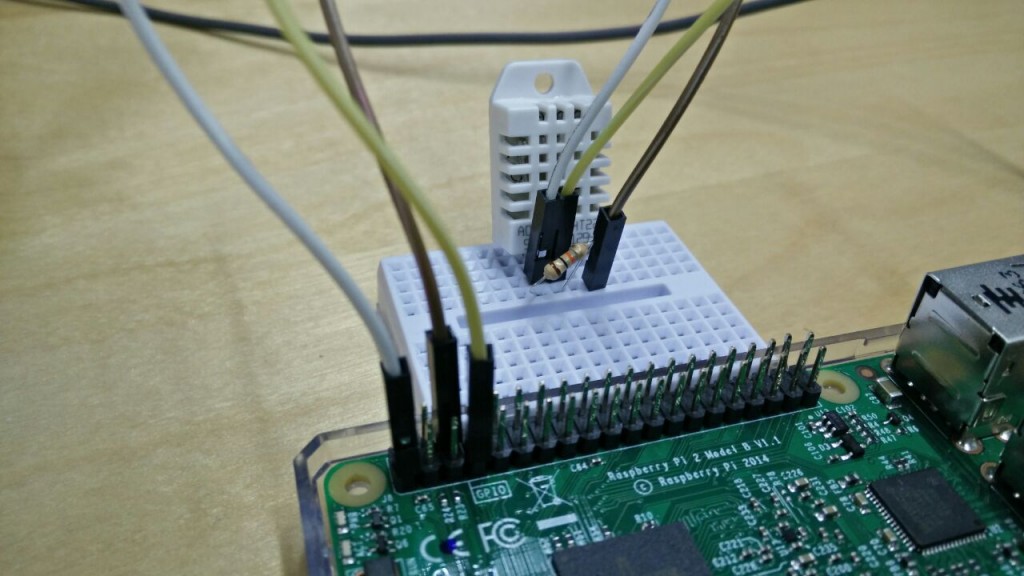
After setting up your circuit, it should look something like this:

Connect to the GPIO4 (pin7), pin 1 for the voltage (3v3) and pin 6 for ground. The resistor goes between the first two pins of the sensor. The third pin of the sensor need not be connected to anything.
Part 2: Script to Read the Sensor Values
Next, we’ll have to stream the temperature readings collected by the DHT22 to our UI. To stream the data via PubNub, we’ll first need to set up PubNub on the Raspberry Pi. You’ll have to run the following commands on your terminal.
Installing PubNub
Open LXTerminal, and download and install the followings:
Install Python: pi@raspberrypi ~$ sudo apt-get install python-dev
Install pip: pi@raspberrypi ~$ sudo apt-get install python-pip
install PubNub: pi@raspberrypi ~$ sudo pip install pubnub
For an indepth introduction to setting up PubNub with Raspberry Pi, we have a comprehensive getting started guide.
When you connect to PubNub, you need to use publish and subscribe keys. To get your unique pub/sub keys, you’ll first need to sign up for a PubNub account. Once you sign up, you can get your unique PubNub keys in the PubNub Developer Dashboard. Our free Sandbox tier should give you all the bandwidth you need to build and test your messaging app with the web messaging API.
Downloading the Adafruit DHT Library
We need to use Adafruit’s DHT library to be able to read the temperature values from the sensor. To download the library, run the following:
pi@raspberrypi ~$ git clone https://github.com/adafruit/Adafruit_Python_DHT.git

pi@raspberrypi ~$ cd Adafruit_Python_DHT
Walking Through the Code
Import the libraries required for this project. Next, initialize a PubNub object using your PubNub publish/subscribe keys.
Using the read.retry method from the Adafruit_DHT library, we can obtain the temperature denoted by ‘t’ and ‘h’ respectively.
Publish the temperature data on a channel called temp_eon and the humidity on hum_eon. This repeats until the program is terminated, so constant temperature and humidity readings are consistently streamed.
In this example, we’re plotting the temperature data on a line graph and the humidity data on a gauge graph. Be sure that the temperature and humidity readings are published to two different channels.
Real-time Graphs with EON
Open PubNub Developer Console and Debugger, then input the same keys and channel name used in the above Python script. You’ll see the temperature readings on tempeon and humidity readings on the humeonchannel respectively.
Now it’s time to visualize the data using EON.
Temperature Data (Line Graph)
For the temperature data, we’ll use a line graph. Paste this code in your text editor and open it in a browser. Your UI receives real-time temperature updates and plots it on the line graph.
temp-line.html: Subscribes to the channel that the data is being published on, to the type of graph, and how the axes should be displayed.
For the humidity data, we’ll use a gauge chart. Paste this code in your text editor and open it in a browser. Your UI receives real-time humidity updates and plots it on the gauge.
hum-gauge.html: You can choose various parameters like the min and max for the graph, as well as the different thresholds and colors for each of them.
EON includes easy-to-understand code for simple copy and pasting. You can choose from a number of different charts, including splines, donuts, gauge, and bars, so feel free to decide how you want to display your data. Even better, it all works in the browser.
And that’s it! If you want more, check out some of our other Raspberry Pi tutorials.
