
We're excited to announce the release of our Chat Components for Android. We've created ready-to-use components for Android developers that make it simple to add essential chat features to your app without the need of developing your own backend services, reducing your time to market. Sign up to learn more about our Chat Components for Android release using the form below. Then, read on to learn how you can use our new Android components in an existing open-source Android app.
PubNub’s Chat Components for Android are easy-to-use, prebuilt UI and chat building blocks to reduce app development resources in getting an application to market.
You can depend on PubNub’s infrastructure of real-time communication for user lists, channel lists, and messages in <100 ms worldwide latency and 99.999% SLA-backed reliability.
Best of all, let PubNub handle the backend services for you. PubNub powers all of the messaging features you would want in a chat app: message delivery in real-time, metadata, presence, and other chat-related data to facilitate the actions within the chat UI components.
PubNub’s Chat Components for Android can be integrated into your application for a variety of use cases. Chat apps like live event messaging, telemedicine, multiplayer chat lobby, and service desk support can be built with minimal effort using our Android components with features such as:
User and Channel Metadata: Add additional information about the users, channels, and their memberships (and store it locally for offline use).
Subscriptions: Subscribe to user channels automatically.
Messages: Publish and display new and historical text messages.
Presence: Get currently active users, observe their state, and notify them about changes.
Typing Indicators: Display notifications that users are typing.
Persistent Data Storage: Store messages, channels, and users locally.
Paging: Pull new data only when you need it.
Jetpack Compose: Build native UI with a modern toolkit.
Our Chat Components for Android are modifiable to your requirements, so you’re free to create chat for various use cases all with different functionalities and customizable looks.
This tutorial illustrates how to take PubNub’s Chat Components for Android and integrate them into any Android application to add chat functionality. This post includes all the steps you need to use the chat components.
You will add chat running on the PubNub Network to JetNews, which is an open-source news application built using Android Kotlin:
This open-source mobile app was selected to add chat driven by PubNub’s Chat Components because it could benefit from chat as an additional feature. This Android project was chosen because it wasn't created by PubNub. We wanted to show you how easy adding Android Components in real apps like this one is easy.
The tutorial was built using Android Studio Bumblebee 2021.1.1 and PubNub Chat Components for Android. We recommend using the latest version of Android Studio available. It is recommended to review PubNub’s Chat Components for Android overview to learn more about chat components.
The complete application of this tutorial is available in the GitHub Repository, in the finished-application branch. The source code contains everything performed in this tutorial.
How to Create Chat UI in Android using PubNub
Before using PubNub's Chat Components for Android, you should know why PubNub is the best choice for powering them. PubNub is used for real-time message delivery, metadata, presence, and other chat-related data to facilitate the actions within the chat UI components.
PubNub is a fantastic backend API for all types of real-time chat applications because it offers a lot of functionality that you never have to build yourself. Some essential advantages of PubNub are:
PubNub delivers billions of messages every day and will effortlessly scale with your application as it grows.
Presence features are built-in. Easily create online and offline statuses and typing indicators.
Storage and Playback for message persistence. Persistence is essential for a complete user experience.
Mobile Push notifications to deliver chat messages fast and reliably regardless of whether the application is in the foreground or background.
Although not presented in this tutorial, you can implement mobile push notifications into your completed chat app by following PubNub’s Android Push Notifications documentation to receive push notifications by integrating with Firebase via Firebase Cloud messaging (FCM)
PubNub Android Chat Components have PubNub services fully incorporated and are ready to use in an existing Android App. It’s recommended that you’re familiar with Kotlin and Android development if you wish to modify the Android components for use in your application. However, you can still follow along, explore, and use these Android Chat Components without prior experience.
How to Create Chat UI in Android with Mobile Chat Components
The following chat components are included with PubNub's Chat Components for Android:
ChatProvider: Top-level component that sets up default chat configuration for themes, repositories, services, and utilities.
ChannelList: List of channels that represent chat rooms in the application.
MemberList: List of users with properties like names, titles, or avatars.
MessageList: Paginated list of messages with sender details.
MessageInput: Field to send messages and emojis in chat rooms.
For the purpose of this tutorial, you will be implementing the ChatProvider, MessageList, and MessageInput Chat Components. However, you can easily include the other components if they are necessary to your application.
Now that you have an understanding of the available components for Android, let’s get started by setting-up the required accounts and software.
Getting Started Building an Android Chat App
To be able to utilize the power of the PubNub Network and receive/send messages in a chat room, you’ll need to sign-up at PubNub to create a free account and configure some required settings. The end result will be two API keys that you’ll use in your mobile chat application. A PubNub account and API keys are always free (perfect for startups).
You’ll first need to sign up for a free PubNub account.
Sign in to your PubNub Dashboard. You are now in the Admin Portal.
Go to Apps on the left hand side of the Portal.
Click the Create New App button in the top-right of the Portal.
Give your app a name.
Click Create.
Click your new app to open its settings.
When you create a new app, the first set of keys are generated automatically. However, a single app can have as many keysets as you like. PubNub recommends that you create separate keysets for production and test environments.
Click on the keyset generated.
Enable the Presence feature for your keyset. This will be used to show how many users are active. Enter "ENABLE" in all caps to confirm your choice. Leave the default settings.
Enable the Storage and Playback feature for your keyset. Leave the default settings.
Click Save Changes on the bottom right of the portal to save your changes.
Copy the Publish and Subscribe Keys to a text editor. You will need them later in this tutorial.
Download Android Studio
This tutorial was developed using Android Studio Bumblebee 2021.1.1. Download the latest stable version of Android Studio for your operating system. This download includes the IDE, Android SDK, and Android Emulator.
Android Application Setup & Configuration
Now that you have your PubNub API keys and software installed, you will set up and configure the open-source Android app.
Download the JetNews app from the GitHub Repository, in the base-application branch. This app is a news feed application and will be your starting point when you add chat features. There are three different ways to download the app:
In a terminal, if you have installed Git or GitHub Desktop as mentioned earlier, navigate to an empty folder of your choosing. Enter the following command to clone the Repository.
Click on the Green Code button, and select "Open with GitHub Desktop” if you have downloaded the GitHub Desktop Application described in the prerequisites.

In the same menu options as the image above, click on the green "Code" button and click on the “Download ZIP” option to download a zip file containing the repository. Extract this file and place it in a desired location on your computer.
After downloading the app, open the 'JetNews' folder in Android Studio. Once the project has loaded, you will need to create an android virtual device via the Device Manager to emulate the application in a virtual environment. In this tutorial, Pixel 4 API 30 was used as the virtual device.
After creating a virtual Android device, switch to the Project View instead of Android View in the top left corner, as this tutorial describes locations of files in this Project View:
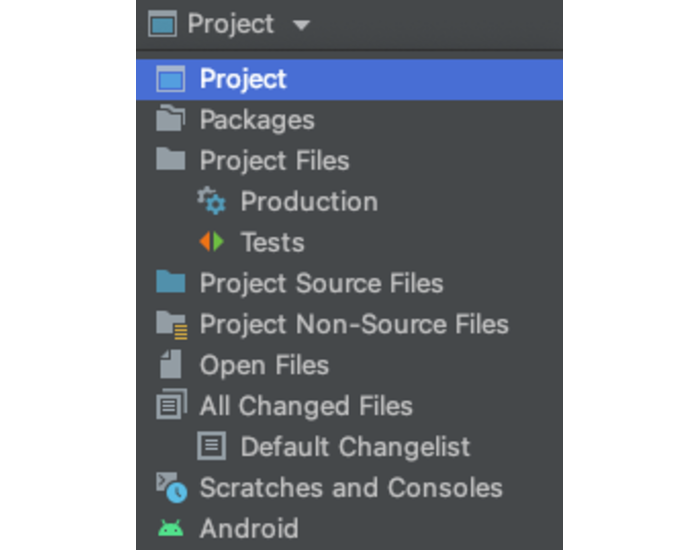
Note: The tutorial will be referencing this view frequently when adding files, and will refer to this window as the project file viewer. Please keep this side toolbar open when developing your project.
Add the publish and subscribe keys constants at the end of 'JetNews > gradle.properties' in the project file viewer. Replace the value of these strings with your PubNub Publish and Subscribe Keys taken from your PubNub Account.
In the project file viewer, open 'JetNews > app > build.gradle'. Add the PubNub Dependencies for Kotlin SDK and Chat components for Android at the end of the dependencies block to include the chat sdks.
In the same 'build.gradle' file, include two buildConfigFields in the defaultConfig property in android that enable you to use the publish and subscribe keys throughout your app. The completed defaultConfig is as below.
You will need to sync the Gradle files so the application can detect these new dependencies. Click on the "Sync now" button at the top of the file after saving or press the "Sync Project with Gradle Files" Button in the toolbar at the top of Android Studio.

Open 'JetNews > app > src > main > AndroidManifest.xml' to view the manifest of the application. The PubNub Network API requires internet permissions, otherwise you cannot connect to the PubNub Network. Add the following line in the manifest element, before the application block.
In the project file viewer, in 'JetNews > app > src > main > java > com.examples.jetnews > ui', right click and create a new package called 'chat'. Then, right click on the newly created package 'chat' and perform 'New > Kotlin Class/File'. Create one Kotlin Class titled 'ChatActivity.kt' and one Kotlin File titled 'Chat.kt'. This class and file will be discussed and implemented at a later time.
To be able to use the PubNub Chat SDKs, you will need to import the necessary packages in each of the files using the PubNub API. These packages are provided when implementing the chat components in their respective files.
Integrating PubNub Android Chat Components
The chat functionality will be implemented as a separate screen when clicking on a chat icon when viewing an article. You will first need to setup the icon to open the chat room as a separate screen.
Initialize the Database
This application uses the PubNub network to obtain previous messages sent by users for the articles (chat channels) they chatted about. This application will also use the Android Room message persistence library to save data in a local database.
In the project file viewer, import the package to use this database in 'JetNews > app > src > main > java > com.example.jetnews > JetnewsApplication.kt', the entry point for the application.
Then proceed to initialize the database in the same 'JetnewsApplication.kt' file in the onCreate function. The onCreate function will then look as the following:
Add the Chat Button
Ideally, a chat room would be available on a per article basis, where the ID of the article is used as the channel name in the PubNub Network. For this tutorial, the only chat room that will be created is titled “default-article”. This means that there is only one chat room (channel on the PubNub Network) in this tutorial. To get to the chat room, a chat button will be added to the bottom toolbar of each article.
In the project file viewer, add a new button to the bottom bar in the ArticleScreen function in 'JetNews > app > src > main > java > com.example.jetnews > ui > article > ArticleScreen.kt' by adding a new function parameter onOpenChat to the bottom bar initialization function BottomBar.
Note: Please comment out the modifier = Modifier.navigationBars... parameter in the BottomBar function call. There is a current commit that is causing build failure due to this line.
Update the initialization function BottomBar in the same 'ArticleScreen.kt' file with this new onOpenChat parameter by adding a function to style the chat button (handled in 'JetNewsIcons.kt') and to apply the click event handler.
In the same 'ArticleScreen.kt' file, add the function openChat that handles the click event. This function will change the activity to now transition to the chat room. The error for the ChatActivity parameter in the Intent function will be resolved towards the end of the tutorial in the Add the Activity section.
Add the packages to 'ArticleScreen.kt' to use the ChatButton function and 'ChatActivity.kt' class.
In the project file viewer, navigate to 'JetnewsIcons.kt' in 'JetNews > app > src > main > java > com.example.jetnews > ui > util'. You will add a function ChatButton that handles the click event and styles the chat icon.
The image of the chat icon uses Icons.Filled.Chat in the material package. Replace the androidx.compose.material.icons.filled packages instead with androidx.compose.material.icons.filled.*. The file package imports should now look like the following:
Add the function ChatButton to handle the click event and style the chat icon. The text will be added as a string resource as described below. This is for best practice and is already in place for this open-source application.
In the project file viewer, add the string for the chat icon as a string resource in the "Article Screen block by adding a new string element in 'JetNews > app > src > main > res > values > strings.xml'.
Incorporate PubNub Chat Components
Navigate in the project file viewer to 'JetNews > app > src > main > java > com.example.jetnews > ui > theme > Theme.kt'. Add two package imports to this file to begin using the PubNub API.
Add the new function ChatAppTheme below the JetNewsTheme function. ChatAppTheme defines the chat application’s theme and will call the ChatProvider Chat Component, which is a top-level component that sets up default chat configuration for themes, repositories, services, and utilities.
'ChatActivity.kt' and 'Chat.kt' will contain the logic of incorporating PubNub Chat Components into the open-source application. Both files are presented in its entirety below, but highlight the important functions to demonstrate how the chat components are constructed.
ChatActivity.kt
'ChatActivity.kt' contains the logic of initializing the App Context, generating user IDs, creating the publish and subscribe memberships, and populating the database with these memberships.
The 'ChatActivity.kt' class is given below in its entirety. Copy this code in the project file viewer to 'JetNews > app > src > main > java > com.example.jetnews > ui > chat > ChatActivity.kt'.
Let's dive into the key functions of the 'ChatActivity.kt' class.
onCreate
Initializes the chat room by calling the Chat Provider component in 'Theme.kt' and the other necessary functionality for the MessageList and MessageInput Chat Components.
For the purpose of this tutorial, it creates a static channel name that defines the chat room name of "default-article".
initializePubNub
Creates and sets the PubNub Object.
Houses the configuration containing a UUID, publish key, and subscribe key.
UUID is 6 randomly generated characters. Helper method getRandomString is called to perform this action.
Publish and subscribe keys are called from 'build.gradle' defined in the set-up.
BuildConfigis generated when building the application.
ChannelView
Obtains the messages from the channel ID and displays the chat messages by calling on the
Chat.Contentfunction (more on this in the 'Chat.kt' section below).
AddDummyData
Creates the user object with UUID, and creates a membership so that users could subscribe to channels
Automatically handles subscribing to channels for you.
Fills the database with members (users) and membership data.
This will automatically create the connection for the user to be subscribed to this channel and be able to receive messages from other users.
Chat.kt
'Chat.kt' displays and sends messages by using the MessageList and MessageInput Chat Components. These UI components are displayed in column format for easy visual representation.
In the project file viewer in J'etNews > app > src > main > java > com.example.jetnews > ui > chat > Chat.kt':
Let's break-down what the two components are doing:
MessageList
This component is responsible for displaying provided messages.
It can display all or a selective group of messages of the channel/application to users.
A particular parameter to focus on when using this component is the messages parameter.
This parameter is obtained by creating a MessageViewModel class to store and manage UI-related data.
It then calls a function to grab the required number of messages (in this case,
getAll), which returns the paged list of required data based on the date.
MessageInput
This component is responsible for sending messages (publish) and showing the typing indicator.
Add the Activity
As described earlier, the chat functionality will be implemented as a separate screen when clicking on a chat icon when viewing an article. To do this, you will need to add a new activity element with the path to the 'ChatActivity.kt' Class created earlier.
Open the 'AndroidManifest.xml' file in 'JetNews > app > src > main'. There should currently be one activity listed: .ui.MainActivity. Below this activity block, add a new activity to the manifest for the chat room to be available as a separate screen:
Running Your Chat App
You are now ready to test and run your application. To run the application, you will be focusing on the top toolbar in Android Studio. Sync the files by clicking on the “Sync Project with Gradle Files” button in the upper right corner of Android studio:

Select “app” as the Run/Debug Configuration, and choose the emulated device created earlier as the available device.
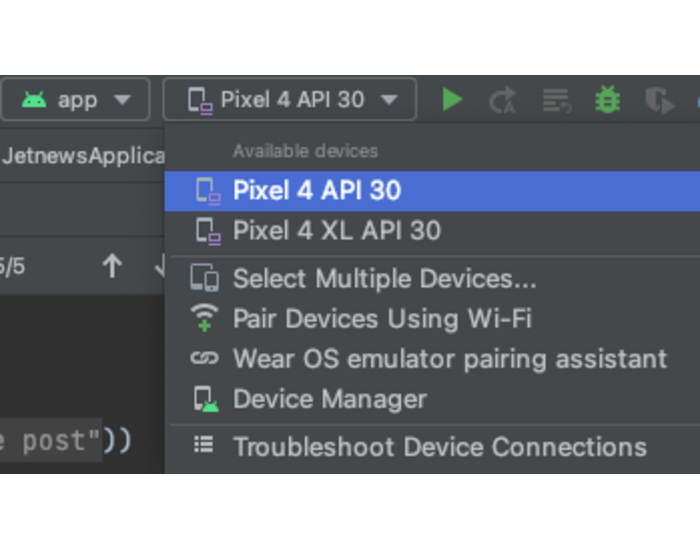
Click the green play button next to the available devices drop-down to run the application. The emulator will display and load the JetNews application on the virtual device.
Note: Depending on your machine/processes going on, a pop-up stating that the app is not responding may appear as the app is loading/in-use. Click on the “wait” option to allow the app to load.
Once the app is loaded, click an article to view. Click on the chat icon on the bottom toolbar to open the chat room.

You can view previous messages sent in this chat room for the article and send chat messages by click in the Type Message field, typing a message, and pressing the send button.

Verifying Your PubNub Connected Message App
You might be wondering how to determine if this chat app is actually running on the PubNub Network. To be able to verify that the application is connected to the PubNub Network, you will need at least two users registered in the database for the “default-article” channel. You will be connecting to the network from two separate sources and each source is required to connect using a user already registered in the database.
To do this, restart the application and repeat the same process of running the application above to register another user. The usernames are the UUIDs needed for communication in the network.
Go to the debug console in the browser while you are in the chat room in the application. In the debug console, enter in the publish and subscribe keys for the keyset that the application is using. You will also need to enter in the channel name of "default-article" in the channel field. Finally, enter the first UUID (username) generated from the application that already exists in the database.
Subscribe to this channel by clicking the slider on the right hand side in the debug console:
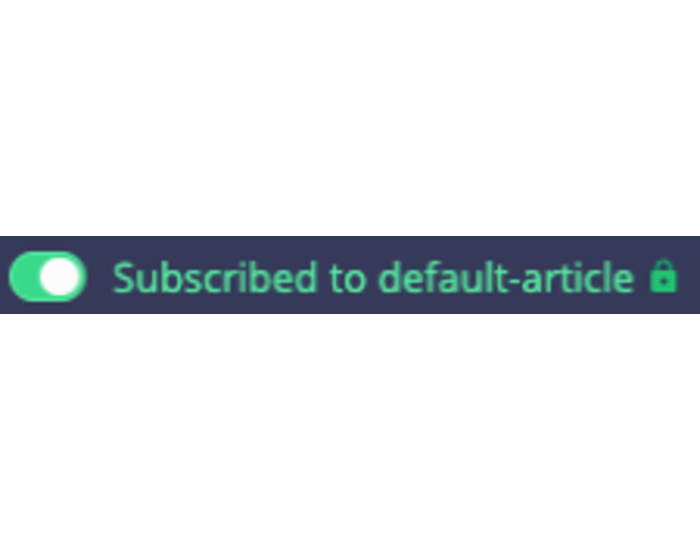
You're now ready to test the publish/subscribe functionality essential to the PubNub Network for your chat app.
In the Android Application, begin typing. In the debug console, you can see a typing indicator in the debug console in the Messages section:

Send your new message in the Android app. You should be able to see the received messages get logged in two places in the debug console.
In the Messages section:
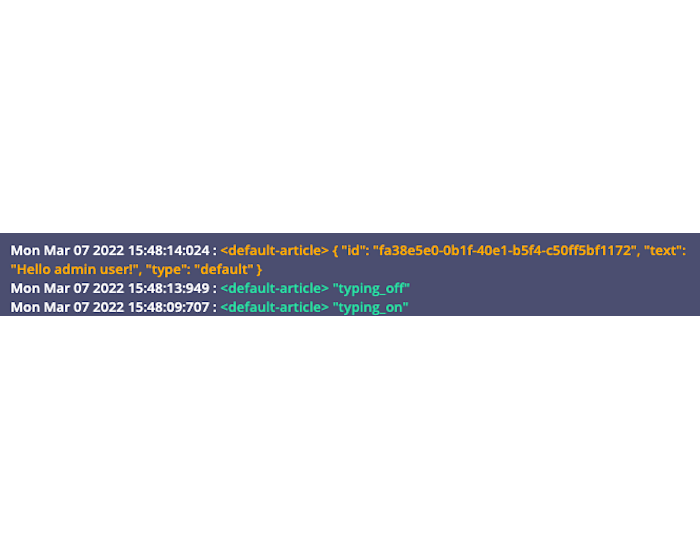
In the Persistence section in the bottom right hand of the screen by clicking on the refresh icon in the same section:

Finally, you will send a message from the Debug Console to your Android App to test the subscribe functionality.
In the debug console, send a message by formatting a message in the Message section.
Format the message as a JSON object. Include the following three fields:
text: The message the user wants to send.type: The type of the message - leave asdefaultas shown below.id: The ID of the message in the PubNub Network. This must be a unique, random string. The example below shows the message with a generated id that is slightly altered from the id sent by the application.
Below is an example of a message to send to an Android application.
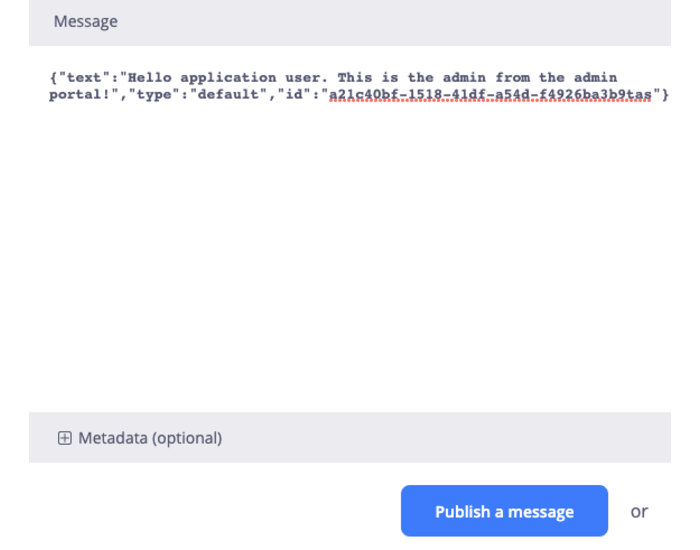
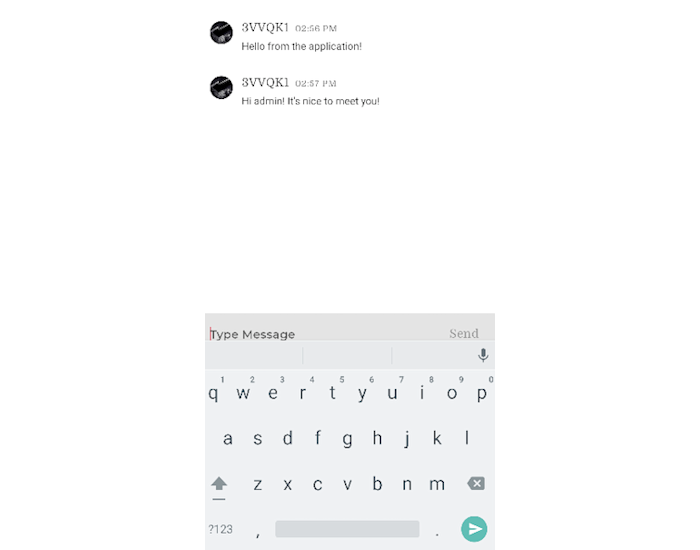
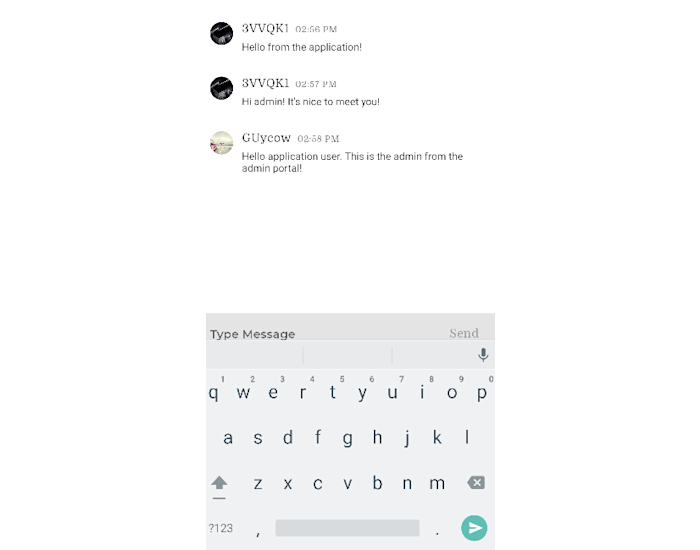
Press the blue “Publish a Message Button” as shown in the above screenshot. You should be able to view this message from the admin user in the application chat room:
What’s Next with Android Chat Components
In this tutorial, you looked at how PubNub’s Chat Components for Android can be implemented into an existing application. You set-up a PubNub Account, configured and integrated PubNub chat components into an open-source Android Application, and successfully created a working chat app. The complete application of this tutorial is available in the GitHub Repository, in the finished-application branch. The source code contains everything performed in this tutorial, as well as cleaning up unnecessary files for this application.
PubNub’s Chat Components for Android provide a fantastic starting point to build chat into any Android application. Let PubNub handle creating and maintaining a reliable, stable, and fast real-time infrastructure so you can focus on customizing the components to fit your application’s needs.
Take a look at our Kotlin SDK and Android Chat Components documentation to further customize your application. Enhance this chat app by adding the ChannelList and MemberList Android Chat Components to list the different article chat rooms and list of users. You can even expand this chat app to be a group chat, as demonstrated in PubNub’s React sample chat app.
Need some assistance modifying or building with Android Chat Components? Get in touch with our sales team and we’ll help you get started.


