Real-time IoT Analytics: Connecting Your Devices (Part One)

Upcoming Webinar!

Arduino Microcontroller and the Future of IoT
A demonstration of the powerful impact that Arduino microcontrollers are having on smart home devices and a look at the current market space of the Internet of Things.
There’s a tipping point in a person’s life where they just have too many Raspberry Pi’s out in the field. Controlling coffee machines, speakers and LED Hue lights, for the everyday maker, you’ve got a lot going on. This is where real-time IoT analytics comes in – you need to track your different internet-enabled devices.
Overview
Before we dive into the code walkthrough, let’s think about real-time analytics
In reality, our use case isn’t just limited to a Raspberry Pi. Feel free to connect any IoT device through whichever method you feel is good.
All the code is available on the Github.
What’s the Best Way to Send Data?
Before we rigidly define our streaming method, let’s first go over some key concepts.
The first one to understand is the publisher/subscribe design pattern. It may sound daunting but in reality, all it means is that there is a channel where you are publishing your data. Anyone subscribed to that channel will receive that data. This will help us in our project because it will allow us to publish our IoT device data and our interface which is subscribed to that channel can display it in a readable format. Learn more about publish-subscribe patterns here.
Now that we’ve looked at our project on an individual device level, let’s also see how we can expand it so that any device can connect and we can group our different channels.
This leads into Channel Groups, otherwise known as Stream Controller. This labels all the channels under one umbrella so instead of subscribing to each individual group you can discover all of them by subscribing to the channel group.
We’ll be using the channel groups to group all of our IoT devices and each IoT device will have a unique channel where it can send its data over.
Connected Internet Of Things – Now Available in PubNub Flavor
To start, you’ll have to sign up for a PubNub account to get your pub/sub keys. Worry not, it’s free with a generous sandbox tier!
Once you’ve done so, we’ll create a simple Python script that will add our device to our channel group. Then we’ll send data through the device specific channel we define. The data will be in a format that both sides can understand (in this case JSON).
Now we can begin by importing the libraries and packages. The code is also available on Github as data_collector.py.
from pubnub.callbacks import SubscribeCallback
from pubnub.enums import PNStatusCategory
from pubnub.pnconfiguration import PNConfiguration
from pubnub.pubnub import PubNub
We can now configure our PubNub object to connect to our channels/channel groups and send data.
pnconfig = PNConfiguration()
pnconfig.publish_key = 'insert_your_pub_key'
pnconfig.subscribe_key = 'insert_your_sub_key'
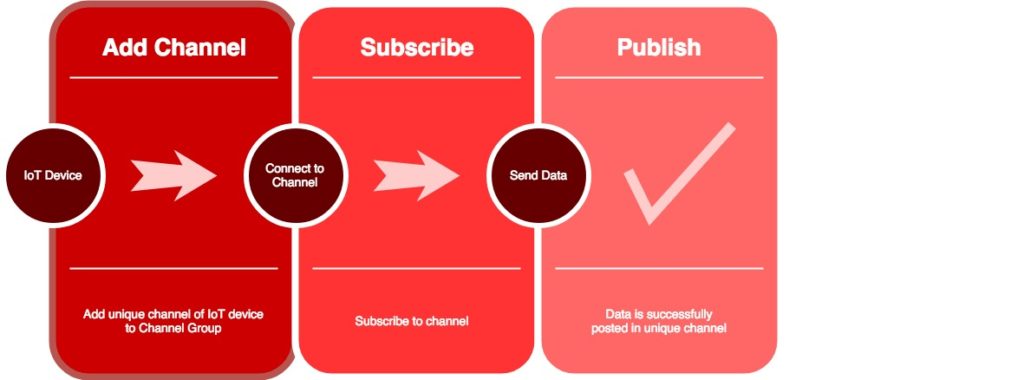
Our functionality should follow this flow:

def my_publish_callback(envelope, status):
    if not status.is_error():
        pass
    else:
        pass
class MySubscribeCallback(SubscribeCallback):
  def presence(self, pubnub, presence):
    pass
  def status(self, pubnub, status):
    if status.category == PNStatusCategory.PNUnexpectedDisconnectCategory:
       pass
    elif status.category == PNStatusCategory.PNConnectedCategory:
      while True:
        temperature = random.randint(20,23)
        pubnub.publish().channel(hostname).message(
        {
           'Temperature': temperature
        }
        ).async(my_publish_callback)
        time.sleep(3)
      elif status.category == PNStatusCategory.PNReconnectedCategory:
        pass
      elif status.category == PNStatusCategory.PNDecryptionErrorCategory:
        pass
  def message(self, pubnub, message):
    print(message.message)
The my_publish_callback function is created so that once we perform a publish the function will execute the defined device behavior.
Then we created a MySubscribeCallback class which we’ll use later to subscribe to our channel. This class will allow us to publish data to our channel. Specifically, we have a status function which has our PubNub object and status passed in. This function then checks the status of our connection and reacts accordingly. In the case that our connection is successful, we publish our data in JSON format to our channel.
At this point, without functions and classes made, we can create our channel group and append our channel.
pubnub.add_channel_to_channel_group().\
    channels([hostname]).\
    channel_group('your_channel_group').\
    sync()
pubnub.add_listener(MySubscribeCallback())
pubnub.subscribe().channels(hostname).execute()
We also added a listener which creates a MySubscribeCallback instance. At this point, our python script should be running and should successfully be publishing data to our channel.
Before you can run the file be sure to go through the installation steps on the Github page.
By the end it should look something like this:
When we complete our Python script, we should be able to see data coming to our channel. We can do this by choosing our keyset on the Admin Dashboard, then navigating to the debug console in the side menu. Then, entering our unique channel name as the channel should allow us to view incoming messages.
Next Steps
Now that our devices are connected, we need to create the UI that receives and visualizes the live data. We’re going to build a React Native app to do just this.